Connecting the dashboard to Active Directory
Intuitive Dashboards ships with its own internal user authentication and permission system. However, it may be desirable to connect the software to a Microsoft Active Directory (‘AD’) or other LDAP-compliant repository of network users. The advantages of authenticating via a repository are:
- Setup of users and passwords will be taken care of by the AD repository.
- Users can login using their normal network ID and password.
- If required, the user can be auto-logged in to the dashboard based on their Windows network ID.
Changing the dashboard.config settings
Before making the below changes, please ensure the Intuitive Dashboards service is stopped.
Firstly, open "Dashboard.config" under the below default path in a text editor of your choice:
C:\Program Files\Intuitive Business Intelligence\Intuitive Dashboards\Server
Then to set the system up for Active Directory, the Authentication section should be changed so that the Attach value on line 177 is equal to “true” as below.

Moving onto the Membership section on line 221, the internal membership provider which is the default provider for all new and clean installations, will need to be disabled by annotating it out.

Once complete, the Active Directory Membership Provider settings will need to be activated by removing the default annotations on lines 228 and 233. An LDAP connection string as well as an authorised username and password will need to be entered. The LDAP connection strings will be particular to your network setup – you should consult your AD SysAdmin for more information.

Note that in Cloud-based deployments of Intuitive Dashboards it is still possible to connect to the domain controller using its IP address using the following connection string format:
LDAP://10.10.10.246:389/DC=ABC,DC=local
However, it is important to note that a range of firewall ports are required to be opened on both servers to establish a “trusted” connection. For a description of the ports required please review https://support.microsoft.com/en-gb/kb/179442
Finally, for Active Directory installations that use security groups, the Membership Role settings will need to be activated by removing the default annotation from lines 242 to 249. No changes need to be made to these settings as they derive their LDAP connection as well as the required username and password from the Membership Provider detailed above.

Logging in for the first time
The dashboard can only use either internal authentication or AD-based authentication–it is an either/or switch. Therefore, once connection to AD has been established for the first time, the user repository inside the dashboard will be empty (since no users have yet been attached). To gain access, the dashboard.config file should be altered as follows to allow a temporary ‘superuser’ login on line 183:

Enabling “superuser” allows any valid AD user to login (without needing a valid password..) to the dashboard and be treated as an administrator. Once a user is logged in, they can create users (and at least one administrator) by attaching users from the Active Directory.
NOTE: When logging into the dashboards, you only need to enter in the username itself, you can omit the domain name from the login. i.e. instead of “Mydomain\administrator”, enter in “administrator”.
To attach a new user, go to the main menu, hover over admin and go to “Users”. Then select the icon for “Attach”:

Here you can search for any of your AD users. In the below example I have searched for the domain administrator, clicked the search button and clicked the checkbox next to their name:

You can also use the asterisk symbol '*' as a wildcard for searching for users, as this will display all available users for selection.
By clicking “OK” on this screen, I have now loaded up this AD account into the users’ screen. We now need to provide some additional details, as well as any objects they need access to on the right-hand side:

In the above example, I’ve ensured in Step 1 that the administrator account is highlighted, in Step 2 I’ve filled out the necessary user information (the fields with an asterisk on the left) and given it the administrator role, and then finally in Step 3 I’ve given it appropriate access to my folders. Once your selections have been made, save your changes.
When an administrator exists, the above configuration settings from line 183 should be changed to either comment out the superuser setting or set the value to “false”. Once the Intuitive Dashboard service is restarted, the administrator setup in the previous step should be used to create users on the system.
Configuring Auto-login
Auto-login allows the end user to be automatically logged into the dashboard user interface without having to first type user credentials. This functionality is only in place when authentication through Active Directory is enabled.
Note: Configuration of auto-login can be challenging due to the network and server environment in place. For example, a multi-domain environment requires extra setup and troubleshooting for the IIS/Client handshake to be completed successfully, furthermore it is highly sensitive to the options that were chosen during the enablement of the IIS role on the dashboard server. Therefore, partners installing a solution are advised to initially setup the system without auto-login. Once the resulting system is working as expected (including the creation of new users attached from the AD domain controller) and the individual is comfortable and experienced with the software, then it may be advisable to proceed with auto-login setup.
Auto-login principles
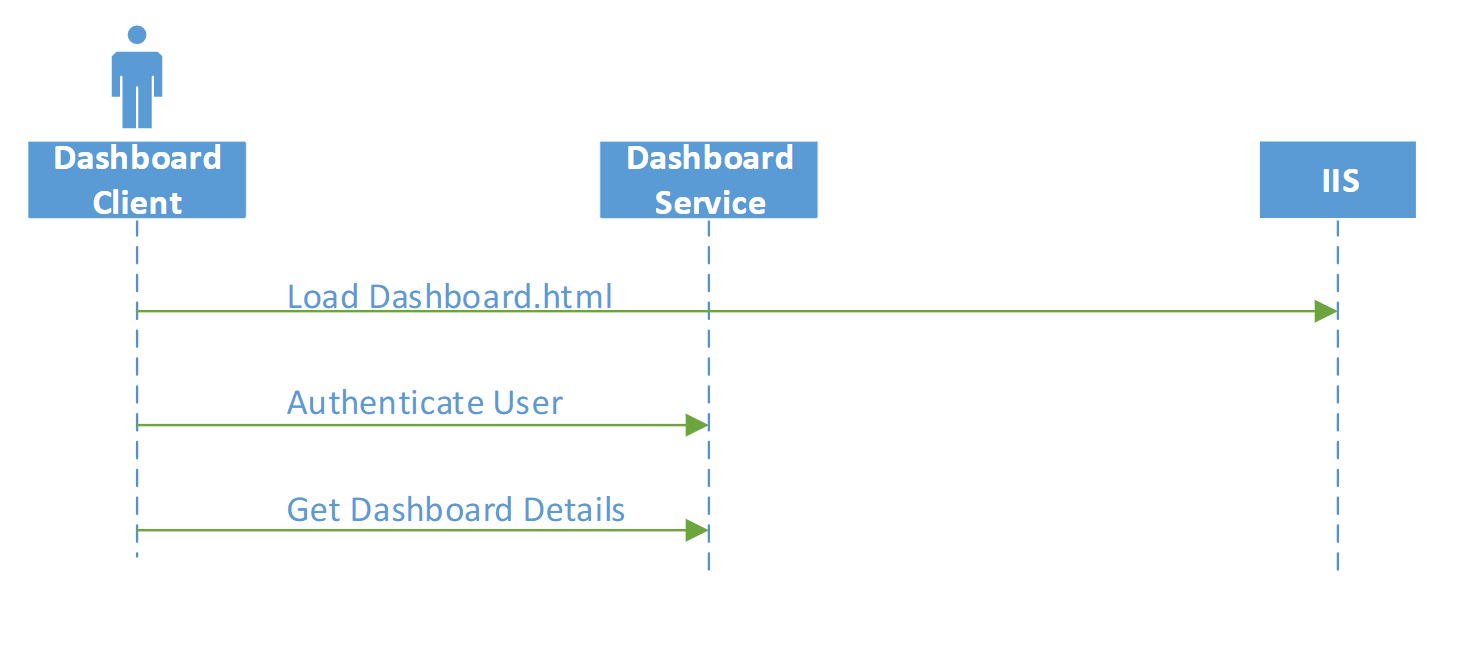
When not configured to use Auto Login, the only time IIS is used is to load the client as in the setup below: -
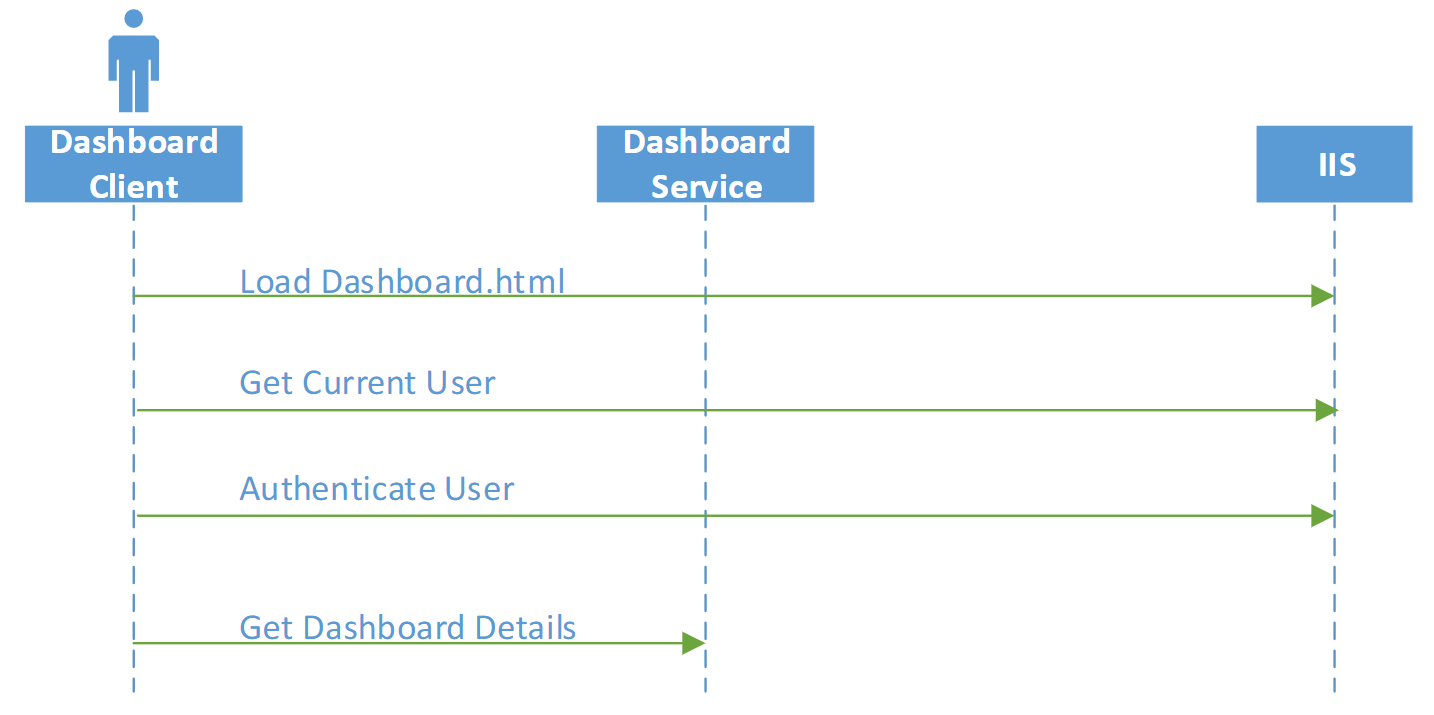
When the dashboard is configured to auto login the user then the sequence of events is in the following diagram i.e. All authentication is carried out by making calls to IIS.
Setting up IIS
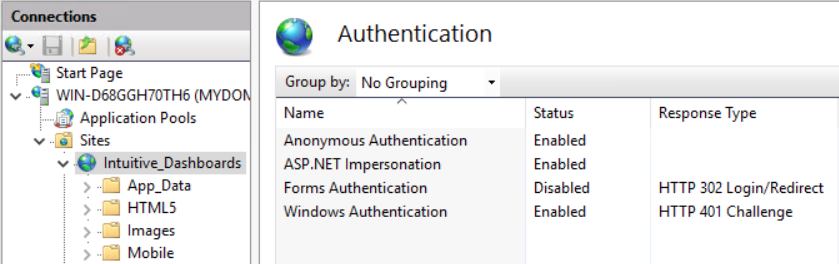
In order to allow auto-login, the previous steps to configure Active Directory support should be completed first. IIS should then be changed to enforce Windows authentication. This is achieved by navigating to the ‘authentication’ icon within IIS manager for your intuitive website. The settings that need to be enabled are Anonymous, ASP.Net Impersonation and Windows as shown in the picture below:
Additionally, the Application pools within IIS should be altered to use .Net4 as shown in the diagram below:
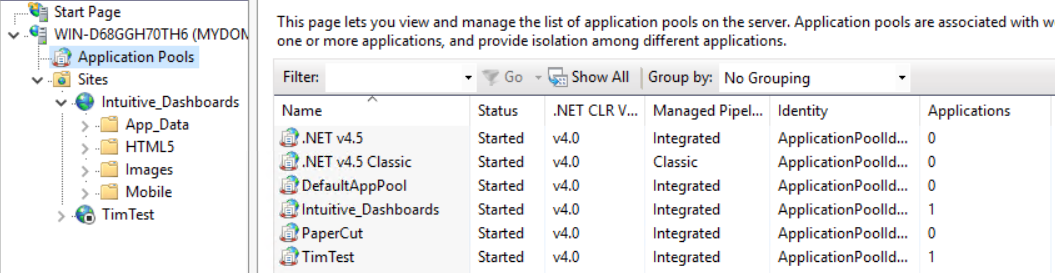
If the Intuitive_Dashboards website appears on the above list within ‘Application Pools’, it should be set to use .Net4.
If the .Net4 settings do not appear as an option within IIS7 or IIS6, then it may be necessary to run the ASP.Net setup which can be found in the following location: C:\Windows\Microsoft.NET\Framework\v4.0.30319\aspnet_regiis.exe
Changing dashboard.config settings
The dashboard.config file on the server should be altered to introduce the External Authentication setting. The <Service> section needs to have uncommented an entry like this on line 76:

In general, it’s important to ensure that when the user browses the dashboard website, the dashboard URL shows in the browser as an intranet (as opposed to internet or trusted) site. If this does not show correctly then a network administrator can change settings to resolve.
Changing web.config settings
Additionally, to enable auto-login you’ll need to alter the web.config file normally found in C:\ProgramFiles(x86)\IntuitiveBusinessIntelligence\IntuitiveDashboards\Client\(your path may be different).
The connection Strings section should be altered to include the Active Directory LDAP settings from the dashboard.config <connectionStrings> section described above.
Additionally, the system.web section should include new settings for extracting Users and Roles from AD. These will be the same as those found in the dashboard.config <system.web> section described above.
Auto login with GUID
Alternatively, you can set up auto-login with the users' GUID into the URL which will automatically sign them in.
Firstly, in the dashboard.config file, go to line 202 and change the value for "AllowLoginWithUserIdentifier" to true:

In the dashboard under "Admin", open "Users", locate your target user and select them on the left hand side of the screen.
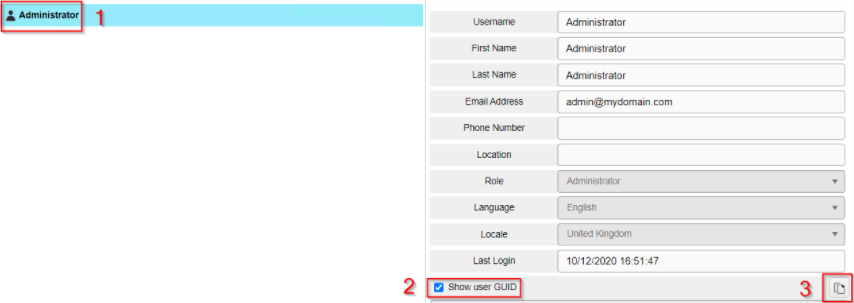
In step 1, I've selected my account. In step 2, I've checked the box for "Show user GUID" which opens a pane for the GUID then on the right hand side of this panel under step 3, I can then copy this to my clipboard.
We can then build this ID into our URL, I've included an example down below where "Localhost" is the address to my dashboard and the "12345678-ABCD-1234-ABCD-123456789ABC" string is my GUID. You'll want to swap this value for the one gained from the users menu.
http://localhost/HTML5/index.html?user=12345678-ABCD-1234-ABCD-123456789ABC
You can then use this URL to log you directly in to the dashboard with that account.