Creating a new dashboard
Creating a new dashboard is possible when logged in as either a Dashboard Designer, System Designer or System Administrator. The 'Dashboard Builder' menu item is available only to these types of user. If you want to build dashboards but don't currently have permission, please contact your dashboard system administrator.
Design Tip #1 - we recommend first building at least one component before creating a new dashboard.
To create a new dashboard
3 The Dashboard builder will open and automatically show the Dashboard Settings pop up where you now have the choice of three dashboard types you can create. If in doubt about their functions, choose 'Standard'. Later topics contain more information about Master-Detail and Parent-Child dashboard types.

4 In the Dashboard Settings window you will also be able to specify:
Design Tip #1 - we recommend first building at least one component before creating a new dashboard.
To create a new dashboard
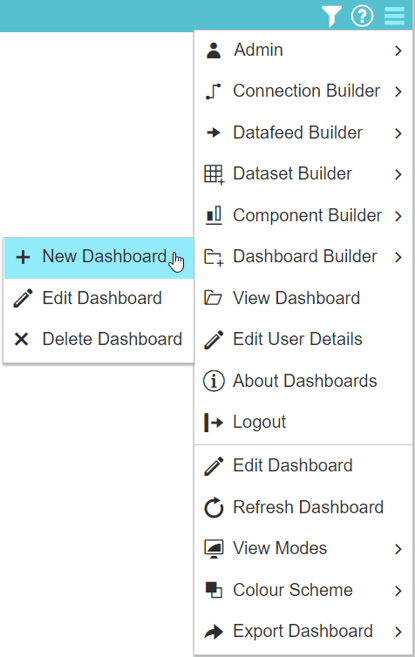
1 Click the Menu button.

2 Select Dashboard Builder from the menu > New Dashboard.

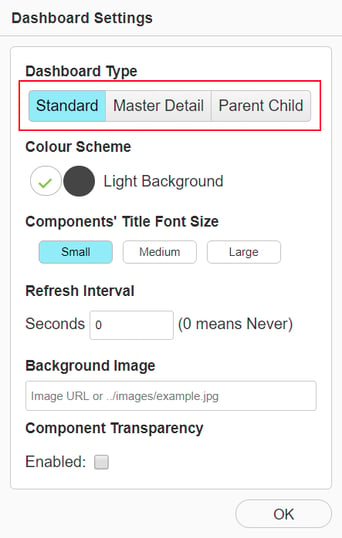
3 The Dashboard builder will open and automatically show the Dashboard Settings pop up where you now have the choice of three dashboard types you can create. If in doubt about their functions, choose 'Standard'. Later topics contain more information about Master-Detail and Parent-Child dashboard types.

4 In the Dashboard Settings window you will also be able to specify:
- The dashboard colour scheme
- Automatic refresh intervals
- Component title font size
- A dashboard background image file i.e. jpg, png etc.
- Component Transparency, so the background image can be seen through the component.
5 Once you have made your selections, you can click OK. If you need to change or edit any of these settings, you can click on the Dashboard Settings  icon.
icon.
6 Now select the components you wish to add to the Dashboard initially. Additional components can be added later using the  Icon.
Icon.
7 Give the dashboard a title as Save the dashboard using the save  icon.
icon.
8 A copy of the dashboard can be made using the Save As  Icon.
Icon.